![]()
Blog Posts
For a definition of blog posts, see The Elements of a Blog.
Your Web site displays only published blog posts. But from the Workarea, you can see all blog posts, regardless of status. In the Workarea, you can also create, edit, delete, and archive blog posts in the same way you work with content.
Blog Posts on the Site
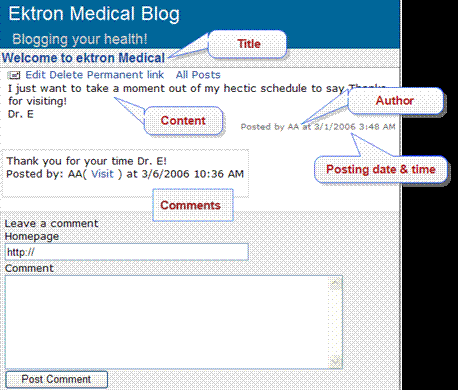
You can view published blog posts on the Web site. A blog post has a Title, Content, Comments Link, Post Time, Date, and Editor Information. Below is a breakdown of a blog post on a site.
|
Item |
Description |
|
Title |
The headline of the post. Usually what a site visitor scans through to find a post to read. |
|
Permanent Link |
If you click this link, a new screen appears. The new screen indicates the permanent link to this blog post. As long as the blog post is active within Ektron CMS400.NET, you can access it via the URL in the browser’s address bar. Most blog pages show only recent posts. After a post is moved off the blog’s front page, it is still accessible via this link. |
|
Content |
The body of the post. |
|
Comments Information |
The comments link shows the number in parentheses of comments for a post . When this link is clicked, a new page of comments for the post appears. Also on the page is a form to add comments about the post. The comments only appear if a site visitor has logged in or authentication is not required for blog comments. |
|
Editor Information |
The person who created or last edited the blog post. |
|
Post Time and Date |
The date and time a blog post was created or last edited. |
Blog Posts in the Workarea
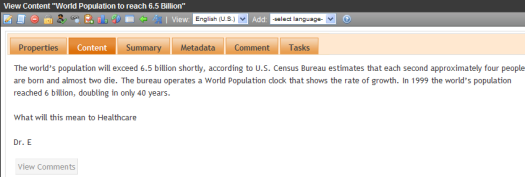
Viewing a blog post in the Workarea is similar to viewing content in the Workarea. Navigate to the folder that contains the blog. Next, in the View Posts in Blog screen, click the title of the blog post. Below is an example of a blog post in the Workarea.
The View Posts in Blog screen shows the following information about each blog post.
See Also: Blog Posts; Permissions and Approvals
|
Item |
Description |
|
Title |
The headline of the post. Usually what a site visitor scans through to find a post to read. |
|
Comments Information |
The comments link shows the number in parentheses of comments for a post . When this link is clicked, the View Comments for Post screen appears. If a red flag ( |
|
Editor Information |
The person who created or last edited the blog post. |
|
Post Time and Date |
The date and time the blog post was created or last edited. |
|
Status |
The status of the blog post. For example, if the blog post is checked in, the status is I. See Also: Content Statuses |
 ) appears next to the comments icon, they are awaiting approval.
From this screen, you can perform all functions with a blog post that you can with content. You can give it a summary, add metadata, associate a task, assign Web Alerts, etc. You must have Edit permission for the blog to perform these functions.
Note: You can also add a history comment to a blog post by clicking the Comment tab. This is not the same as adding a comment to a blog post on a site. A history comment has the same properties as a comment associated with content.
Adding a Blog Post
Note: To be able to add a blog post, you must have Add permission on the blog’s Standard Permissions screen.
Follow these steps to add a blog post.
1. In the Workarea, navigate to the blog folder. Choose New > HTML Post.
Or
From the Web site, open the menu for the blog then choose New Post.
Note: To add a blog post from the Web site, you must be logged in.
2. When the Add Content screen appears, use the editor to create the blog post. You create a blog post the same way you create content. See Also: Adding HTML Content.
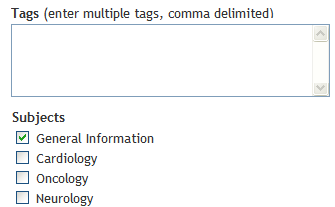
Important: If you are using subjects or tags, they can be assigned to a blog post by clicking the Summary tab and choosing a subject. For more information, see Blog Subjectsand Tags on the Summary Page.
3. If the user creating the post is a member of the blog’s approval chain, it is published immediately. If not, the post is surrounded by a yellow border. A member of the approval chain must approve it before it appears on the Web site. (For more information, see Approval Chains.)

4. Once the post is published, it appears within the blog on the Web site.
Tags on the Summary Page
You can add tags to a blog post to further define information about the post for blog search engines. For example, you create a blog post about your favorite band, Ektronica, and enter the following tags:
Music
Guitars
Rock & Roll
When a person visiting a blog search site searches for Rock & Roll music, your blog post appears. Some blog search sites have a page specifically for searching blog tags.
Editing a Blog Post
Note: To be able to edit a blog post, you must have Edit permission on the blog’s Standard Permissions screen.
Follow these steps to edit a blog post.
Note: If another editor changes a blog post, the posting information reflects the new editor, the date, and the time the information was changed. This is important to remember if you want the original person who posted the blog to get credit for the post.
1. In the Workarea, navigate to the blog folder.
Or
From the Web site, open menu for the blog then choose Properties. Next, choose the post.
Note: To add a blog post from the Web site, you must be logged in.
2. Click the blog post title you want to edit.
3. Click Edit ( ).
).
4. Change the blog post.
5. When the blog is published, the changes appear in the blog post on the Web site.
See Also: Blog Posts
Approving a Blog Post
If someone who is not a member of the blog’s approval chain creates or edits a blog post, its status is set to Submitted. It only appears on the Web site after a member of the approval chain approves it. While its status is Submitted, it has yellow border on the View Posts in blog screen.
To approve a blog post, see Approve/Decline Content.
Deleting a Blog Post
Note: To be able to delete a blog post, you must have Delete permission on the blog’s Standard Permissions screen.
The following steps explain how to delete a blog post.
1. In the Workarea, navigate to the blog folder.
Or
From the Web site, log in, open the menu for the blog, then choose Properties. Next, choose the post.
Note: To delete a blog post from the Web site, you must be logged in.
2. From the menu, choose Delete > Posts.
3. The Delete Contents screen appears.
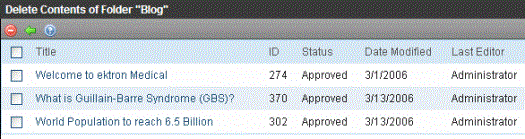
4. Click the check box next to each post you want to delete. To select all posts, click the check box next to Title.
5. Click Delete Contents ( ).
).
6. A dialog box asks you to confirm.
7. Click OK to delete the selected posts.


![]()